
Thank You Tutorial! My Gift to you…
Thanks to those of you who downloaded my Ebook yesterday! I was OVERWHELMED by the support. I have a great support system who also shared the posts. Â I hope you will take a moment to give me some feedback by leaving a review on Amazon by clicking HERE and leave your review just below the description of the book. That is how I can best get other readers to engage. Thanks for taking the time..it means everything to me. I am backing off a bit until we celebrate Halloween but want to give everyone lots of time for planning!
I do want to leave you with the instructions on putting together your “Making Christmas Memorable” planner:
1- Download adobe file after signing up for our newsletter on our HOME page. Â Save to your desktop for future use.
2- Print pages 1-19 on heavier white card stock.
3- I chose to print pages 20-49 o a heavier weight plain white or linen paper to enhance the performance of the planner.
4- I used  a 1 1/2″ white binder with a transparent sleeve on the front to include the cover picture.  I purchased mine from Wal-Mart for $2.79. Page 1 will be the cover that you will print and slide into the transparent sleeve on the front of your binder.

5. Slide cover into the transparent sleeve on the front of the binder.

6- Cut spine tab off of the tab page (page 2) and insert into the spine of your binder.

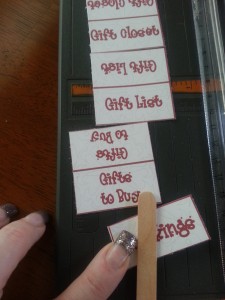
7. I use a popsicle stick to ease the spine into the sleeve.  Be gentle as to not rip the tab.

8. Cut the tabs into pairs. See picture. (For a professional look you may chose to purchase tabs for binders and label yourself. I wanted to provide an alternative to keep costs low.)

9. Â Fold tab in half and use a popsicle stick to give you a nice creased fold.
10. Set tabs aside and 3-hole punch all divider pages. Â Place in order that you desire and will work most efficiently for you.

11. Â Take a glue stick and coat the inside of the tab and then slide the divider page between the tab fold and center so that 1/2 the tab is over the edge of the divider and press to glue together.


12. Â I chose to move each tab a little further down the page so that I can see them all at a glance.

13. Â Page 3 is your introductory page that I put in the front of my binder.
14. Pages 20-49 are to be placed behind corresponding dividers.

If you have any questions, feel free to email me at info@threeperfectchristmasgifts.com. Â Happy Planning!


Leave a Reply